
OpenSesame is a free, open source tool for building experiments. In this tutorial, I build a rapid serial visual presentation (RSVP) paradigm of the kind typically used for presenting sentences word-by-word to participants in ERP experiments. The paradigm will send triggers at particular words to the EEG recording computer so that these words can later be located in the EEG recording.
You will need to have OpenSesame installed: https://osdoc.cogsci.nl. There are also several tutorials on that page. The code used in the following tutorial is a mix of sophisticated stuff from this attentional-blink tutorial and Bruno Nicenboim. Anything clunky and any mistakes are my additions.
The code below was made with OpenSesame v3 and has been updated to work with v4+. But do let me know if anything doesn’t work!
Experiment structure in OpenSesame
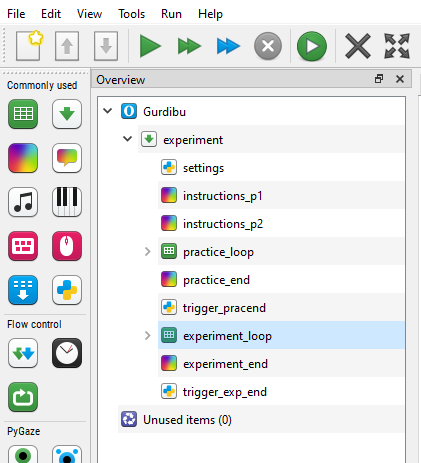
An OpenSesame experiment contains sequences ![]() , which determine the order that different parts of the experiment are shown. Within a sequence, you can have
, which determine the order that different parts of the experiment are shown. Within a sequence, you can have loops ![]() , which show individual trials in a loop until some stopping point is reached. For the experiment in this tutorial, an individual trial is one sentence. The stopping point will be when all sentences have been shown. Here I’ve made a
, which show individual trials in a loop until some stopping point is reached. For the experiment in this tutorial, an individual trial is one sentence. The stopping point will be when all sentences have been shown. Here I’ve made a practice loop and an experimental loop. Some other useful objects are sketchpads ![]() which we can use to display participant instructions and an object where we can write our own Python code
which we can use to display participant instructions and an object where we can write our own Python code ![]() :
:
Getting started
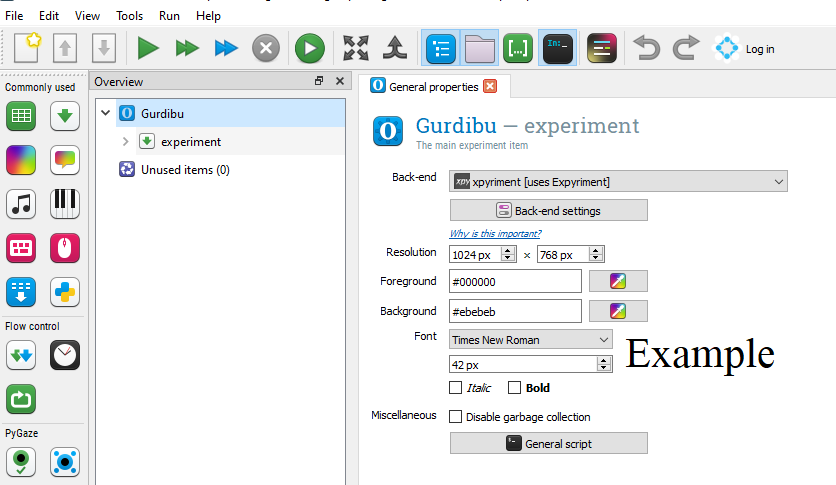
The steps below will re-create the experiment structure above. First, open a new OpenSesame experiment and click on New experiment in the Overview pane. This will open a tab in the main area called General properties. In General properties, you can change the name New experiment to something more interesting; I’ve called mine Gurdibu. I use xpyriment for the Back-end, but on computers with limited graphics capabilities, you might have to choose legacy. This can be changed any time without breaking the experiment. The screen resolution should be that of your lab presentation PC. You can adjust the default font size/colour etc. to suit your lab.
Next, delete any default objects that are currently sitting under experiment.
Very important: Save your experiment now, and keep saving it throughout.
Step 1: Add a test mode
In later steps, we’ll send triggers to the EEG recording computer via the parallel port. Read more about parallel ports in OpenSesame here. But if you’re using a computer that doesn’t have a parallel port (i.e. pretty much any computer that’s not in your EEG lab), OpenSesame will throw an error if you try to send a trigger. To be able to test our paradigm without a port, we can create a test mode where triggers are simply printed in OpenSesame’s code console rather than sent to the port.
From the set of objects on the left, drag and drop an inline_script item ![]() onto the experiment sequence. It should appear one level below experiment, as in the first screenshot above. Right click on the inline script item and rename it settings. Here we will put some general settings and functions we need for the experiment, starting with our test mode.
onto the experiment sequence. It should appear one level below experiment, as in the first screenshot above. Right click on the inline script item and rename it settings. Here we will put some general settings and functions we need for the experiment, starting with our test mode.
Python inline scripts have two elements: a prepare phase and a run phase. You can read about the difference between these two phases here.
For our test mode, we need to paste the following code into the Prepare tab:
# import the python libraries we will use
from psychopy import parallel
import math
import csv


# set test mode to yes or no
var.test_mode = "yes"


# test mode function
# if we are not in test mode...
if(var.test_mode != "yes"):
    # this address will be different for your port:
    port = parallel.ParallelPort(address='0x3FD8')
    port.setData(4)
    port.readPin(2)
    port.setPin(2,1)
    # send triggers to the port
    def sendPP(trigger):
        port.setData(trigger)
        return;
# otherwise, just print triggers
else:
    def sendPP(trigger):
        print(trigger)
        return;
Then paste the following into the Run tab to give you a warning when you’re in test mode:
if(var.test_mode == "yes"):
    test_canvas = Canvas(color = 'red',font_size = 38, font_family = 'sans')
    # Fill it with the word:
    test_canvas.text("The experiment is running in test mode.<br /><br />No triggers will be sent. <br /><br /> (Change test_mode to 'n' in settings for sending triggers through the parallel port.")
    test_canvas.show()
    my_keyboard = Keyboard()
    key, end_time = my_keyboard.get_key()
Step 2: Add participant instructions
Next, from the set of objects on the left, drag and drop a sketchpad ![]() into your experiment sequence. The sketchpad should appear at the same level as settings. Right click on the sketchpad and rename it instructions. I have two pages of instructions in my example above, but you can have as many or as few as you need.
into your experiment sequence. The sketchpad should appear at the same level as settings. Right click on the sketchpad and rename it instructions. I have two pages of instructions in my example above, but you can have as many or as few as you need.
To write on the sketchpad, in the main pane, click on the text icon and then click in the middle of the sketchpad:
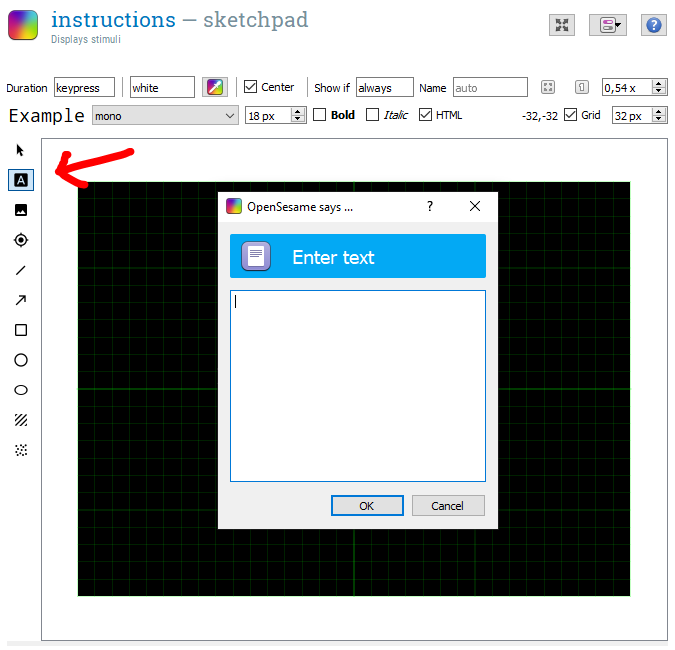
Type in your instructions and click OK. Above the grid, you can change the appearance of the instructions and decide how long to present the instructions for. Since we would like participants to proceed to the next screen only when they are ready, we will leave the default keypress in the Duration field instead of setting a fixed time.
Step 3: Create a practice loop
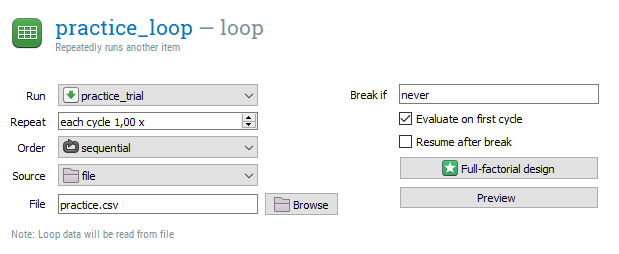
Now we’ll make a loop of practice sentences. Drag and drop a loop ![]() so that it’s at the same level as the instructions and settings items. You can drag items up and down in the overview pane to change their order. Right click the loop and rename it practice_loop.
so that it’s at the same level as the instructions and settings items. You can drag items up and down in the overview pane to change their order. Right click the loop and rename it practice_loop.
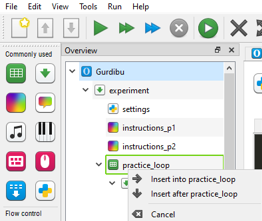
Next, we need to tell OpenSesame what order we want things to happen in for each practice trial, so drag and drop a sequence ![]() onto the loop. You will get a prompt; select
onto the loop. You will get a prompt; select Insert into practice_loop:
Right click on your new sequence and rename it practice_trial. In the end, our practice trial will look like this:
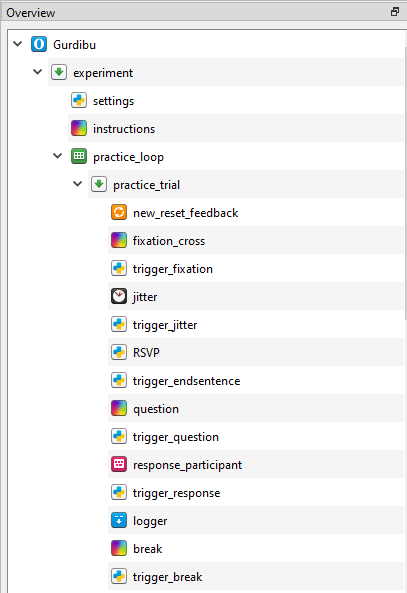
Let’s add each object one by one:
At the start of each sentence, we want to make sure any responses from the participant from previous trials are reset to their default states (e.g. previous answers are cleared). To do this, drag and drop a reset_feedback item ![]() into practice_trial (not after).
into practice_trial (not after).
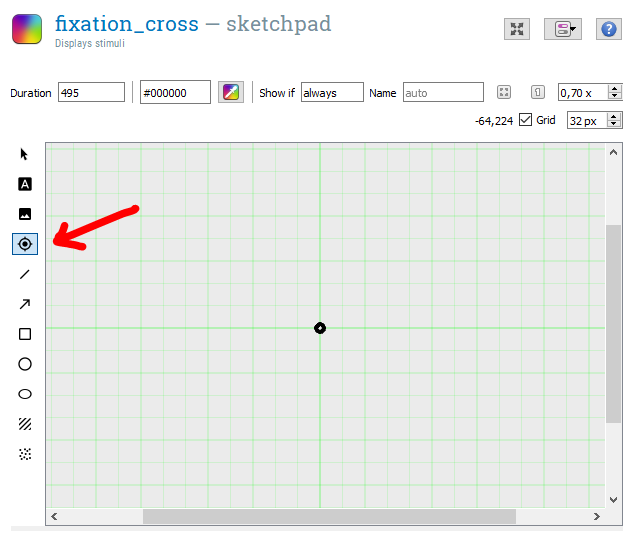
Next, we want to present a fixation cross to focus participants’ eyes before the first word is presented. Use a sketchpad again (rename it fixation_cross), but this time use the fixdot element to make a dot in the middle of the sketchpad. Change the Duration from keypress to whatever you need (I’ve used 495 ms). Note that OpenSesame recommends to use durations that are 5 ms less than what you actually want to account for screen refresh rate:
Next, we want to send a trigger to the recording software to indicate when participants saw the fixation cross. To do this, add an inline script ![]() . Call it fixation_trigger. To send a trigger, add the following code to the Run phase:
. Call it fixation_trigger. To send a trigger, add the following code to the Run phase:
sendPP(194)
clock.sleep(var.trigger_interval)
sendPP(0)
Translated, this code means: send trigger 194, wait a pre-specified interval of time, then send a zero trigger to reset the port. You need the time interval between the 194 and 0 triggers because otherwise they’ll get sent at the same time and you’ll only be able to see the zero in your EEG recording.
The pre-specified interval of time should be added to the Prepare tab of the settings inline script (just paste it anywhere in the Prepare tab, the order doesn’t matter). I’ve set it as 45 ms, but it can be anything:
# minimum interval to wait for trigger
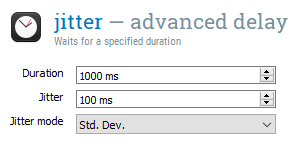
var.trigger_interval = 45Next, add a jitter screen ![]() (call it jitter). This just presents a blank screen for a different, randomly selected duration before each sentence so that participants don’t get entrained to the rhythm of the experiment. I set
(call it jitter). This just presents a blank screen for a different, randomly selected duration before each sentence so that participants don’t get entrained to the rhythm of the experiment. I set Duration to 1000 ms with a jitter of 100 ms and jitter mode of standard deviation:
Then, we add another inline script called trigger_jitter item to send another trigger:
sendPP(195)
clock.sleep(var.trigger_interval)
sendPP(0)
Then, add another inline script and call it RSVP. This is where we’ll program the sentences to be presented word-by-word, but we’ll leave that until Step 5.
After RSVP, add another trigger called trigger_endsentence that marks when the sentence finished:
sendPP(200)
clock.sleep(var.trigger_interval)
sendPP(0)
After some sentences I want to ask participants a comprehension question. To present the question, insert a sketchpad. Add some text to the sketchpad as before; here is an example:
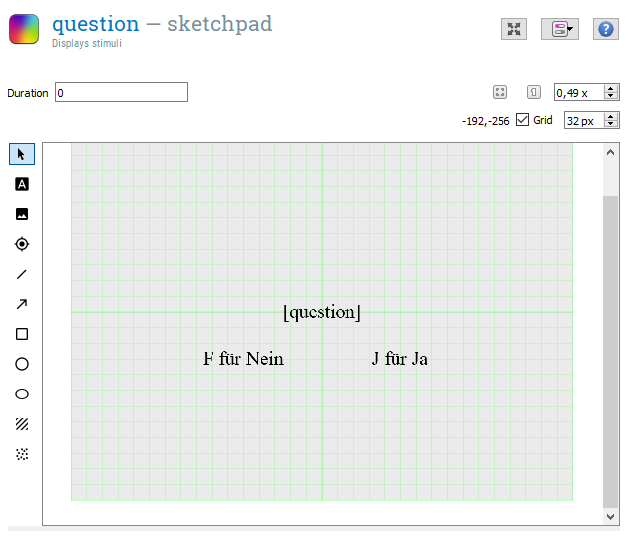
OpenSesame knows that whatever is written between the square brackets (here: [question]) is a variable that exists in our experimental stimuli. I’ll go into detail about adding stimuli in Step 4, but in general, you would have a table that has columns such as item, condition, sentence, question, correct_response. OpenSesame will automatically pull out the contents of the column question that corresponds to the current sentence. Everything on the sketchpad that is not between square brackets will stay the same on every trial, e.g. here I have a prompt to remind participants which keyboard key corresponds to Yes/No. Set the Duration of this sketchpad to zero: the response object coming up will take care of the sketchpad presentation duration.
Next, add a trigger called trigger_question to indicate when the question was asked:
sendPP(196)
clock.sleep(var.trigger_interval)
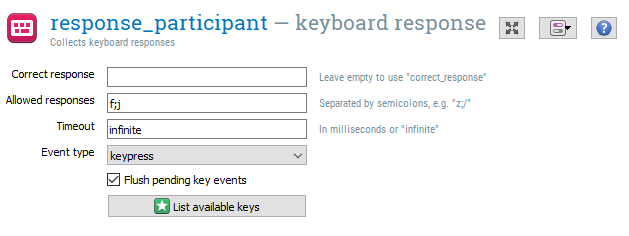
sendPP(0)Now we need to enable participants to answer the question by inserting a keyboard response object ![]() (there are also mouse and joystick objects if that’s what your lab uses). In the response object, we can leave
(there are also mouse and joystick objects if that’s what your lab uses). In the response object, we can leave Correct response blank to use the correct_response from our stimuli table (remember to make sure this is what your correct response column is called!). Fill in the allowed responses and whether you want a timeout; my settings are here:
Add another trigger called trigger_response to signal the response:
sendPP(197)
clock.sleep(var.trigger_interval)
sendPP(0)
Next, we need to log the response using a logger item ![]() . OpenSesame recommends logging all variables; this will include all the columns in your stimuli table, plus a lot of other background things that OpenSesame tracks like timestamps for every step in your trial/loop. These will be saved in a .csv file as the experiment progresses.
. OpenSesame recommends logging all variables; this will include all the columns in your stimuli table, plus a lot of other background things that OpenSesame tracks like timestamps for every step in your trial/loop. These will be saved in a .csv file as the experiment progresses.
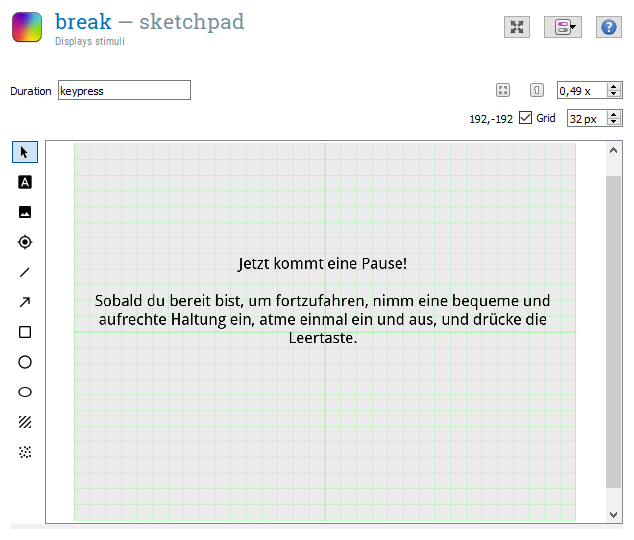
Next, we insert a sketchpad item to offer participants a break. You can set the Duration to a specific time to force participants to take a break of a particular length, or you can let them decide by setting it to keypress:
Then of course add a trigger called trigger_break to indicate the break:
sendPP(198)
clock.sleep(var.trigger_interval)
sendPP(0)
Since we don’t want participants to take a break after every sentence, we can tell OpenSesame to only present this object when some criterion is reached. To set a criterion, go back up and click on practice_trial. In the main window, you will see a list of all the items that appear in that trial, alongside a column called Run if:
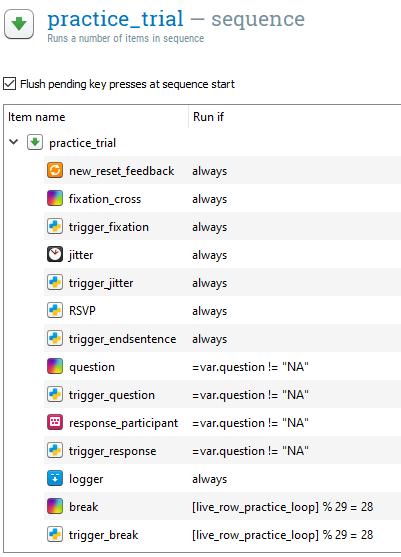
Next to the break object is where we write our Run if criterion: here I have said that if [live_row_practice_loop] divided by 29 leaves a remainder of 28, then show the break screen. [live_row_practice_loop] is a counter that OpenSesame keeps in the background of how many times the trial loop has been presented (i.e. how many sentences have been presented). So participants in this study get a break every 29 sentences. This number and the remainder of 28 was determined by the number of sentences in my experiment and what they were divisible by, so of course you can set this to whatever you want.
Note that we have to apply the same rule to the trigger_break so that it is only sent whenever the break occurs.
I’ve also set some other Run if rules in the practice_loop, namely that the question screen and associated response and trigger items are only shown if there is no NA in the question column of the stimuli table (not all of my sentences have questions).
That’s the practice phase done!
Step 4: Adding stimuli
So where do the sentences come from? Click on practice_loop in your experiment overview. You have two options here: either you can import stimuli from an external file:
or you can write them directly into table provided:
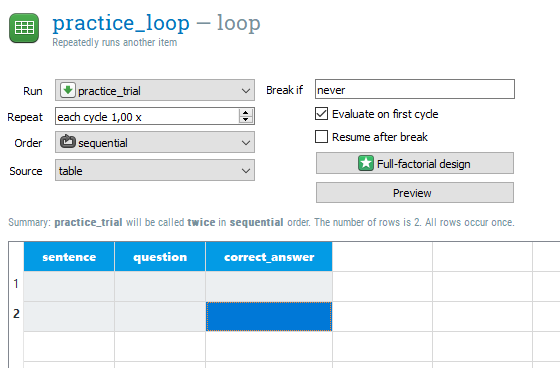
Writing them in the table can be a good idea if you’re using non-Roman characters. For example, I’ve had trouble getting OpenSesame to display German words from external files and it took a lot of vague Python error messages to discover that umlauts were the problem (tip: setting UTF-8 encoding via Microsoft Excel or Notepad++ doesn’t work, but UTF-8 encoding from R does! ¯_(ツ)_/¯ ).
Make sure that the column names of your experimental table or file correspond exactly to the names of these variables that you call elsewhere in the experiment, e.g. on the question sketchpad or in Python inline scripts.
For this tutorial, we’ll use the table. To match up with the code for RSVP that you’re going to write below, your table should have the same columns as this:
Step 5: Setting up rapid serial visual presentation (RSVP)
We first need to go back to our settings inline script and add some functions to chop up sentences into words, calculate their presentation durations, and decide for which words to send triggers and what triggers.
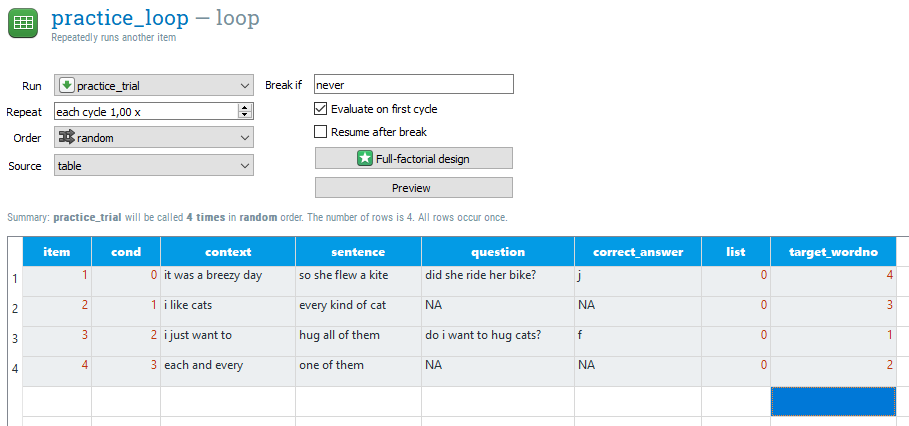
I use a variable presentation duration for each word depending on the word’s length, except for the target word, which I present for 700 ms. But you could also just set each word to appear for the same duration.
For my triggers, I base them on my experimental conditions, which I have numbered from 0 to 3 (note that Python starts counting at zero). So that I can later identify which triggers belong to which condition, I multiply the trigger by the condition number. For the target word, I send a different (also condition-based) trigger: this makes it easier to extract target words from the EEG when you have targets in different sentence positions between conditions or items. The target word trigger is sent whenever the word number matches the column target_wordno in the stimuli table. Since Python starts counting words from zero, target_wordno should be 1 less than the actual word number.
I also only send triggers for words that I might want to analyse later, so I’ve split my sentences into two parts: context and sentence (see the table in Step 4). The code below will send triggers only for the sentence words. But of course you could just have your whole sentence under sentence and send a trigger for each word.
In the Prepare tab of settings, add the following code:
# number of lists (change as appropriate)
N_lists = 1


# number of sentences
N_items = 4


# set some presentation durations
min_dur     = 250      # minimum word presentation duration
base_dur    = 190      # baseline word presentation duration
char_dur    = 20       # number of milliseconds to add for each letter in word
refresh_red = 5        # number of milliseconds to adjust for screen refresh rate


# minimum interval to wait for trigger
var.trigger_interval = 45


# function for calculating word presentation duration
def pres_dur ( stimulus ):
   return max(min_dur, base_dur * len(stimulus.split()) + len(stimulus) * char_dur) - refresh_red


# function to split up sentences into words and add to canvas, define triggers,
# and add word presentation durations. I have sections of the sentence where I
# don't need triggers, but other sections where I do want triggers. So the default
# behaviour of the function is to not send a trigger unless some condition is met.
# The result of this function is a list of canvases, one for every word in the
# sentence, plus a list of presentation durations and triggers for each word.
def stim_prep(stims, trigger = "n"):
    # split the sentence by spaces
    stims = stims.split()
    # for every word in the sentence
    for i, s in enumerate(stims):
        # if we want a trigger (set elsewhere)
        if(trigger == "y"):
            # and if the current word number equals the target word number (from stimuli table)
            if(i == var.target_wordno):
                # send a trigger that is the current word number + the condition
                # number (from stimuli table) and some other stuff
                send = (i + (var.cond + 1) * 10) + 50
            # if it's not the target word, send the trigger like so
            else:
                send = i + (var.cond + 1) * 10
        # if we don't want a trigger, send zero
        else:
            send = 0
        # add this information to a variable called stimuli (defined in RSVP)
        stimuli.append(s)
        # open a blank canvas
        word_canvas = canvas()
        # add the current word to the canvas
        word_canvas.text(s)
        # add this canvas to a list of canvases (the sentence)
        word_canvas_list.append(word_canvas)
        # set the presentation duration of the current word using the pres_dur function
        pres_dur.append(pres_dur( s ))
        # add the trigger for the current word to the list of triggers for the sentence
        trigger.append(send)
    return;
In the Run tab of settings, add a zero trigger to make sure the parallel port is set to zero at the start of the experiment:
sendPP(0)Next, go to the RSVP Python item in practice_trial. In the Prepare tab of RSVP, use the stim_prep function we defined in settings to chop up the sentence for the current trial into words and compute a presentation duration and trigger number for each word. Paste the following code into Prepare:
# Here we create some empty lists for storing things (triggers etc.) that will
# be created by the stim_prep function we defined in settings:

# list of presentation durations for each stimulus presented
pres_dur = []
# list of triggers for each word
trigger = []
# list of words presented
stimuli = []


# blank canvas
blank_canvas = canvas()
# list of canvases for creating visual display
word_canvas_list = []


# apply stim_prep function to the part of the sentence that doesn't need triggers
stim_prep(var.context)

# apply stim_prep function to the part of the sentence that does need triggers
stim_prep(var.sentence, trigger = "y")


# inter-stimulus interval
var.isi = 295
The Run tab of RSVP is where the action happens: all of our prepared words and their associated properties (duration, trigger) will now be presented one by one using a loop:
# for each word in our list of canvases
for word_nr, word_canvas in enumerate(word_canvas_list):
    # show the word
    word_canvas.show()
    # send the trigger that corresponds to that word
	  tr = var.trigger[word_nr]
	  sendPP(tr)
	  # if the current word number equals the target word number in the stimuli table,
	  # presentation duration should be 700 ms (minus 5 ms for screen refresh rate)
	  if word_nr == var.target_wordno:
		    clock.sleep(695)
	   # otherwise present it for the corresponding duration from our pres_dur list
	  else:
		    clock.sleep(pres_dur[word_nr])
  	# clear the canvas
	  blank_canvas.show()
	  # reset the parallel port to zero
	  sendPP(0)
	  # wait for the length of the inter-stimulus interval before the next word
	  clock.sleep(var.isi)

# Note: As of V4, OpenSesame won't log variables defined in an `inline_script`
# unless they are numbers, strings, or None values, even if you prepend them with
# `var.`. There are good reasons for this
# (see https://osdoc.cogsci.nl/4.0/notes/400/#important-backwards-incompatible-changes).

# But we want to save our lists of triggers and words etc., which at the moment
# are list objects, even though they contain strings and numbers. We can convert
# them to strings separated by `_` and log them this way instead:
var.pres_durs_log = "_".join(str(i) for i in pres_dur)
var.trigger_log = "_".join(str(i) for i in trigger)
var.stimuli_log = "_".join(stimuli)
Ok, time to test it out! First save your experiment, then press this play button ![]() to see if your experiment runs. Don’t confuse the play button with this button:
to see if your experiment runs. Don’t confuse the play button with this button: ![]() ; I forget what it does, just don’t press it.
; I forget what it does, just don’t press it.
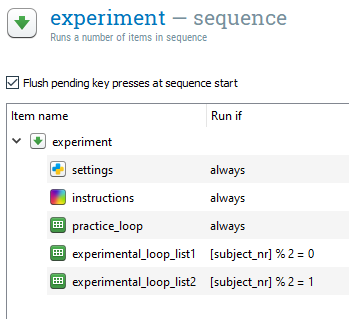
Step 7: Set up the experimental loop
Now we’ve finished our practice phase, we add the real experimental phase. First drag and drop a new loop item into the experiment sequence so that it is at the same level as practice_loop. Rename it experimental_loop. Then, drag and drop a new sequence into experimental_loop and rename it experimental_trial. Copy and paste each of the objects in practice_trial into experimental_trial. To do this, right click on the object under practice_trial (e.g. new_reset_feedback) and select Copy (linked). Now right click on experimental_trial and select paste, and then Insert into experimental_trial. Repeat for all the objects under practice_trial.
The benefit of using linked copies is that any edits you make to one object in one loop (e.g. RSVP) will automatically be applied to all linked items in other loops. Moreover, linking helps OpenSesame streamline the logging process leading to faster run-time.
Next, you need to fill in the table in experimental_loop with your stimuli as in Step 5. You’ll also need to add the break criterion again in experimental_trial, plus the instruction not to present a question if there’s an NA in the question column.
At this point you might want to go back to the practice_loop and change the condition numbers in the stimuli table to something that is different to your experimental conditions, otherwise later you won’t be able to tell which triggers in the EEG are for practice trials. You could also add a practice column to your stimuli with “yes/no”, but this will only be saved in the OpenSesame log file and won’t be visible in the EEG.
Step 8: Finishing touches
Finally, you might like to show participants a message when they finish the practice phase and the experiment. Drag and drop two sketchpads onto the experiment sequence, so that they’re both at the same level as the instructions sketchpad. Drag them so that one is after the practice_loop and one after the experimental_loop. Edit the sketchpads to show participants a message like “That was the practice phase! If you are ready to continue, press the spacebar”.
I would also recommend sending a trigger at the end of the practice phase called trigger_pracend, after the sketchpad we just added:
sendPP(189)
clock.sleep(var.var.trigger_interval)
sendPP(0)
and another one called trigger_exp_end for the end of the experiment:
sendPP(199)
clock.sleep(var.var.trigger_interval)
sendPP(0)
That’s it, your experiment is now ready!
Optional steps
Limiting the number of times a condition can be shown consecutively
The above experiment will randomise stimulus presentation, but you might want to additionally ensure that stimuli from the same condition are not shown more than, for example, twice in a row. To do this, click on experimental_loop in the file tree. At the top right of the tab that opens, click on this icon  and select View script from the dropdown menu that appears. Somewhere in the list, add the following line (I’m not sure if it matters where, but I added it directly before the last line which said run experimental_trial):
# replace cond with whatever your condition variable is titled:
constrain cond maxrep=2
Latin square design
I mentioned earlier that if you have different experimental lists (e.g. for a Latin square design) and you’re using the OpenSesame table rather than external files for your stimuli, the simplest approach is to have a separate experimental_loop for each list.
To do this, create new loops with a trial sequence underneath the current experimental_trial and then Copy (linked) all the trial objects as you did above. Rename your experimental loops with something unique like experimental_loop_list1, experimental_loop_list2, etc. Then you can update the stimuli table with your stimuli from list 2 and so on.
To tell OpenSesame which loop to choose, click on the experiment sequence right near the top of the overview pane. We can set a Run if condition to choose a loop depending on subject number:
If you’re using an external source file, you only need one experimental_loop, but separate source files for each list.
To call your separate source file lists according to subject number, click on experimental_loop and next to File, enter the condition as I have here:
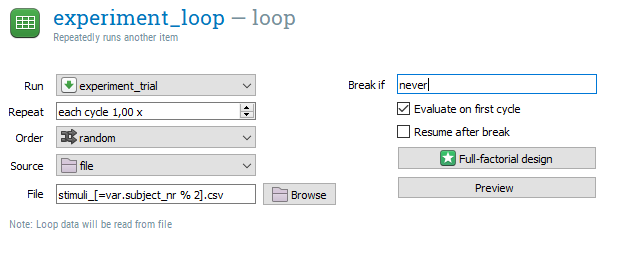
This condition assumes that each of my stimuli files is called stimuli_1.csv, stimuli_2.csv, etc., and OpenSesame will pick which one based on the subject number. Even fancier would be to have one external stimuli file which OpenSesame loads and splits into lists itself, but I’ll leave that to you.
Happy experimenting!